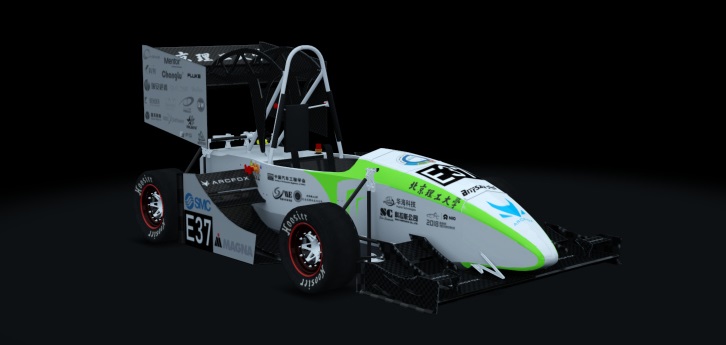
本页为银鲨Silvershark VII 的 Assetto Corsa mod 制作过程的回顾纪录。可供其他mod制作者提供参考借鉴,避免一些初级错误。因为本人初次接触此类mod制作,难免会有许多疏漏,望各位多多包涵。本mod制作需要制作者稍有3ds Max 和 PS基础,如果没有建议先自己学习一些基础操作(就不会像我一样中道崩殂)
0.动手之前
首先需要准备的软件有:
- 神力科莎(Assetto Corsa)
- 3ds Max 或 Maya(本案例将选用3ds Max)
- Photo Shop
- Content Manager
- NotePad++等文本编辑器
- CarTuner,acd_tool,3DSimED等mod制作工具
3ds Max没有具体版本要求。神力科莎需要用到里面的sdk开发者工具包的kseditor制作工具。mod制作工具的下载链接如下:
Content Manager: https://assettocorsa.club/content-manager.html
CarTuner: www.racedepartment.com/threads/assetto-corsa-car-tuner.131997/
3DSimED: http://sim-garage.co.uk/
0.1 开始动手 ……前的热身运动
在这个官网上有制作一个最简单的神力科莎车辆mod的教程 http://assettocorsamods.net/threads/your-first-car-in-assetto-corsa-basic-guide.1019 ,在最下面有一个下载地址,包含了车辆的mod、fbx文件等等,是一个很好的例子,建议先下载一份,在接下来的过程中可以随时拿出来做做实验。 acm_tutorial_basic模型下载
同时此网址对于这个简单的mod也做了较为详细的教学内容,接下来的一部分将会以此教程为辅助进行解释讲解。
(翻译)
\animations
- 这是为汽车存储动画文件的地方。诸如换档,转向等等。你可以从formula_K或其他汽车中复制它。
\data*
- 这是您汽车最为关键的文件夹。里面是汽车物理的所有ini文件。现在整个文件夹被打包在一个名为data.acd的文件中。
\sfx
- 声音文件夹。 Assetto Corsa使用FMOD音频引擎,汽车的所有声音都打包在.bank文件中。为了拥有一个工作车模型,我们需要一个声音。我们将使用现有汽车的.bank音频文件构建简单的解决方案。详情请参阅FMod and Assetto Corsa - unofficial fix。
\skins
- 皮肤文件夹。每个皮肤,都有自己的子文件夹。
\texture
- 非常重要的文件夹。这辆车的所有贴图都必须在这里。首先,您可以从formula_k复制它,因为它在子文件夹框架中还包含一些公共共享贴图。另外,无论你在你的汽车上创建和使用什么新的纹理,只要直接把它放到 \texture 文件夹中就行了。
模型完成并导出到kn5文件后,所有贴图都将包含在kn5中。因此,您可以删除所有,然后保留您从formula_k复制的“默认”纹理文件夹。
这样做的好处:如果你从一开始就使用这个文件夹,在建模阶段,当你在KS Editor中打开它时,材料就已经被分配给汽车了。
\ui
- 这在菜单中使用,包含2个文件:品牌标志(PNG,128x128像素)和ui_car.json中汽车的基本数据。您至少应该编辑汽车名称,才在菜单中方便地找到您的小车车:)。您可以使用记事本编辑它,但为了方便修改所有其他的文本文件,我推荐类似Notepad+的文本编辑器
除此之外在assettocorsa\sdk\dev\content \cars\formula_k文件夹中游戏开发商Kunos还准备了一套车辆模板formula_k(类似低级方程式),data文件夹中的ini文件会包含详细的参数信息注解。关于更多细节的指引可以参见assettocorsa\sdk\dev\car_pipeline_2.0rev \AC_Pipeline_PUB_Rev2.0.pdf,里面有较为详细的mod制作初级指引。
官方初级mod教程(啥都没有的意大利式英语教程):【官方教程】AC car modding - Assetto Corsa Official Media Channel
1. 将已有车辆模型按照对应单位导入进3ds Max中
首先必须要有一份车辆模型。3ds Max支持导入CATIApart,stp,igs等文件,建议将其转换为一份igs文件,而后导入3ds Max。
在导入之前需要先将模型进行简化,将一些内部隐蔽的结构如电机,电池箱内部结构进行移除,缩小文件数据大小,减小传输转化数据的时间,同时减少电脑运算负担。值得注意的是,如果车体用的是单体壳,建议将单体壳的预埋孔删去,以减少单体壳模型的面数(类似有限元分析前网格划分时的优化模型),能简化以后修改模型以及贴图的操作。
导入时注意文件的具体单位转换,和软件本身的单位设置有关,详细设置说明可以通过搜索得到。
2.模型配置
导入后按照前述的初级教程,对3ds Max里面的模型进行初级基本配置。
2/ Preparing your 3D model Screens here are made in Blender, as that’s the tool at hand. Similar concept will apply for 3dsmax, Maya or other modelling package.
*above scene will also be attached to present post
2A: dummy names Set scale to Meters. Model the basic car. A car body and 4 wheels. All objects MUST have a material/texture. Naming (for visual mesh) can be anything. I prefer to use a prefix like VISUAL so it’s clear what part is what.
Create dummies that control the wheels. Remember, when we use dummies, the names are key factor, so always respect them. (use CAPS). In present case (LF stands for Left Front, LR for Left Right, etc): WHEEL_LF WHEEL_LR WHEEL_RF WHEEL_RR
NOTE: never scale them once created (especially if working in 3dsmax). For game logic, it doesn’t matter what size they are, but scaling them afterwards can cause all sorts of issues.
2B: respect scene hierarchy Make every mesh a child to its respective dummy ! In this case, we want the wheels to rotate, so we need to make the visual wheel a child to the dummy. E.g.: Visual_wheel_LF mesh is a child of WHEEL_LF dummy. The hierarchy is very important. If we don’t respect it, the car might load ok, but nothing will move. The wheels would be stationary as if part of the body design .
IMPORTANT NOTES: - all dummies must have Z-axis pointing forward and Y-up. - car’s body origin/pivot point : the model must be placed with the wheels touching the ground on the 0 coordinate (see below).
- pivot point of dummy must be identical to pivot of child mesh (or vice-versa). E.g. below: wheel mesh (colored texture) and the dummy (cube) have identical origin/pivot point.
3. 对主要部件展uv图,为模型贴图做准备
因为车辆肯定少不了会有涂装,所以展uv将是一步必不可少的工作,主要需要展uv的地方是一些大面积显眼的地方,以及有固定图案贴图的地方,比如单体壳,空套等。这个时候单体壳填孔的好处就体现出来了,没有许多小孔在展uv时将会减少不少工作量,并且会得到更高的贴图质量。
展uv图的过程在此就不赘述,网上有许多相关的教程。主要注意展开来的图要利用好位图空间,合理排布,展开图要尽量均匀平滑,表面积大的部件或者是贴图精细的部件需要更大分辨率的贴图,以提高显示质量。
4. 导入到sdk-ks editor进行贴图
ks editor是Assetto Corsa的sdk工具包之一,为模型导入修改贴图用。具体位置在: AC安装文件夹\assettocorsa\sdk\editor\ksEditor.exe 【官方教程】Assetto Corsa editor - Assetto Corsa Official Media Channel
我们将模型导出为fbx文件然后导入ks editor,根据不同贴图需要在左上方选择贴图类型,Diffusion为表面贴图(表面涂装),Detail为纹理贴图(例如碳纤维材料),map为反射贴图(决定漫反射程度)。贴图通过PS对前面所述的uv图进行修改涂装后倒入到kseditor的贴图选项中。之后保存时会生成在fbx文件同目录生成一个 同名ini文件,就是贴图的配置信息文件。贴好图之后就要导出为kn5文件,既Assetto Corsa的mod模型文件。
导出之后覆盖原来下载的mod模型包的kn5文件并改名后就可以再游戏中看到自己的模型啦!
5. 修改模型物理配置信息
车辆mod的物理信息在acd文件中,此时需要acd tool解包工具将acd文件解压成我们能够修改的ini文件。根据软件提示解包后将在同目录生成一个data文件夹,改变里面的ini文件将对车辆信息造成影响。
MANDATORY (without them, the car will not load and game will crash)
aero.ini :used to define all wing-type objects - delete all the wings except ‘body’, then delete all the wings *.aoa files except body. - uses (therefore also needed): - wing_body_AOA_CD.lut - defines the lookup table for Coefficient of Lift - wing_body_AOA_CL.lut - defines the lookup table for Coefficient of Drag * you can add as many wings you wish, but don’t forget to add the corresponding _CD and _CL .lut files for them
cameras.ini - default is ok to start with
car.ini : car parameters. - we should at least change the SCREEN_NAME (can be anything), as it will appear while in-game - IMPORTANT: we don’t deal with suspension animation at this point so be sure to set USE_ANIMATED_SUSPENSIONS=0
driver3d.ini : default is ok to start with
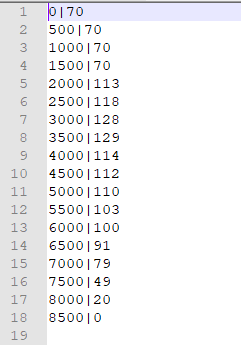
engine.ini : defines engine parameters. - uses the lookup table: - power.lut (mandatory) - note: no coast.lut file is required anymore. Must keep the section in engine.ini to keep AC from crashing, but do not use for data.
lods.ini : used to improve performance (but we’ll speak about it another time) - edit block LOD_0, and put your .kn5 file name - since we don’t have any other LODs at this moment, we delete all other blocks LOD_1, 2, etc
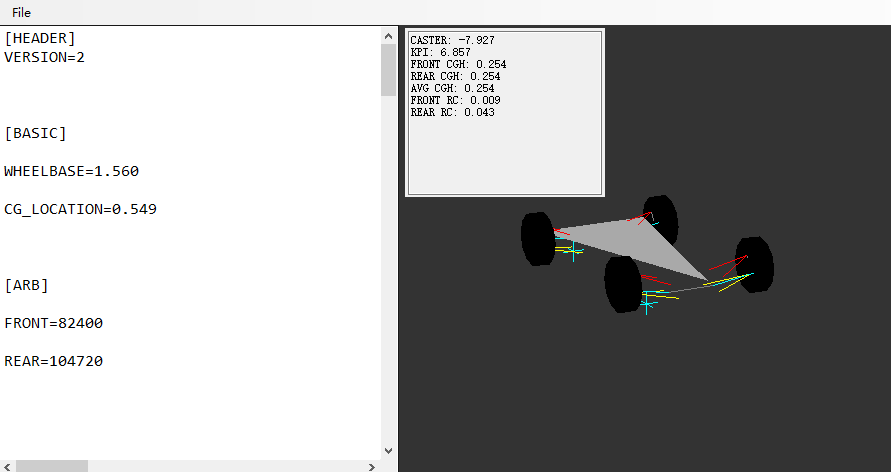
suspensions.ini : suspension type and data - modified wheelbase to 1.9m and CG to 0.3 to match more or less our little 3d model (visual reasons). - NOTE: this indicates the car’s CG so a better suited value to start with is 0.5 (50%front)
tyres.ini : define tyres parameters. - uses lookup tables for both wear and temperature. Depending on the type of tyre you wish to use, corresponding *.lut file must be added. In this case: F3hard_front.lut F3hard_rear.lut tcurve_F3hard.lut etc.
final.rto, ratios.rto These can be deleted, they are used for cars with multiple gear ratio options (as it’s the case for formula_k). The setup.ini will refer to this, so if you do remove them, then make sure to amend that too (just delete the relevant section).
首先在car.ini中修改车辆名字 SCREEN_NAME,按照是否有悬架运动动画来决定修改车辆的悬挂参数 USE_ANIMATED_SUSPENSIONS(0为无,1为有,设置为1而没有动画将导致游戏中模型读取失败)。
然后打开AC安装目录下的\sdk\dev\ksSusEditor\knSusEditor.exe, 点击File导入车辆所在目录下data/suspensions.ini文件。在右边的可视化窗口中可以看到车辆的悬挂图形,通过修改左侧信息可以即时编辑悬挂参数和显示悬挂图形。每项参数的具体含义请参考formula_k文件夹内的同名文件,在参数后面都有注释信息。
接下来修改车辆的引擎。最简单的方法是通过CarTuner替换引擎参数。在没有可用引擎信息的情况下,需要自行修改engine.ini文件来修改引擎参数。同时扭矩曲线被保存在power.lut文件中(lut文件通常包含二维曲线信息),建议用NotePad++等文本编辑器打开。打开后每行是某转速下对应的最大扭矩,“竖杠符”左边是转速,右边是扭矩。修改对应参数以改变车辆引擎参数。
其他的物理信息包括空动(aero.ini),轮胎(tyre.ini),kers(ers.ini)都可以依照上述方法修改。
6. 其他
最后是一些上面跳过的或者是剩余的细小工作。
- collider.kn5 车辆碰撞检测模型
- lod车辆简化模型
- 悬架动画
- 车辆仪表盘信息
- 关于3DSimED
- 车手位置及姿势
- 车辆声音
collider.kn5 车辆碰撞检测模型 collider的造型过程与车辆本体模型类似,只不过collider用于检测车辆碰撞,要求模型包含车辆边界,数据量尽量小。注意collider的坐标应与车辆本体相同,以免造成两者位置偏移。
lod.kn5车辆简化模型 此步骤在模型简单或者是计算性能足够(不需要联机)的情况下可以跳过。简化模型用于优化游戏模型,增强游戏运行表现。所有lod的大小逐级递减,游戏中离视角所在位置越远的车辆将采用约简化的lod模型。相关的配置文件在data\lod.ini中。
悬架动画 悬架动画对于开放式车轮的车辆来说相对比较重要。悬架动画在3ds Max里面实现,然后导入到ks editor之后会生成悬架动画文件.ksanim,将其放入animations文件夹中即可在游戏中实现动画效果。 【视频教程】Assetto Corsa - How to Animate Suspension Using That Script And DIR_ Feature 详细操作方法在pipeline.pdf文件P56后。
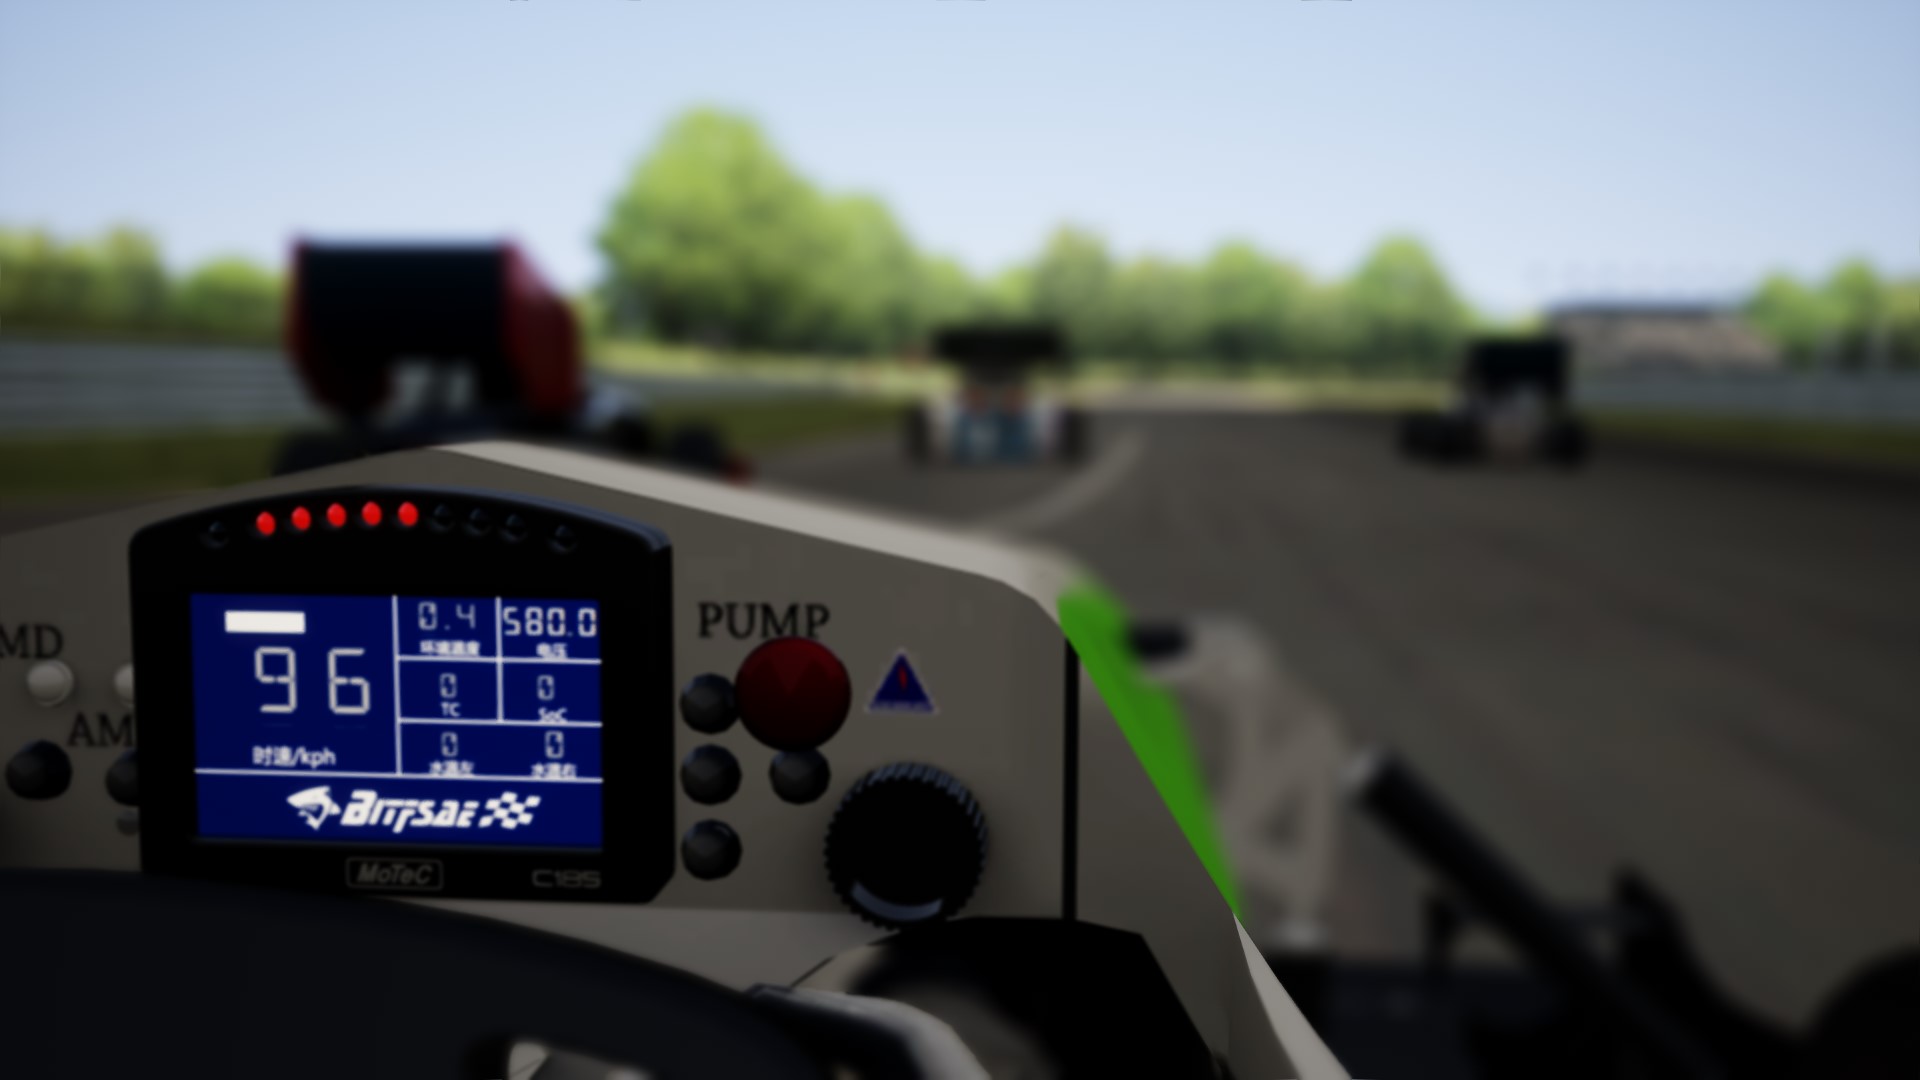
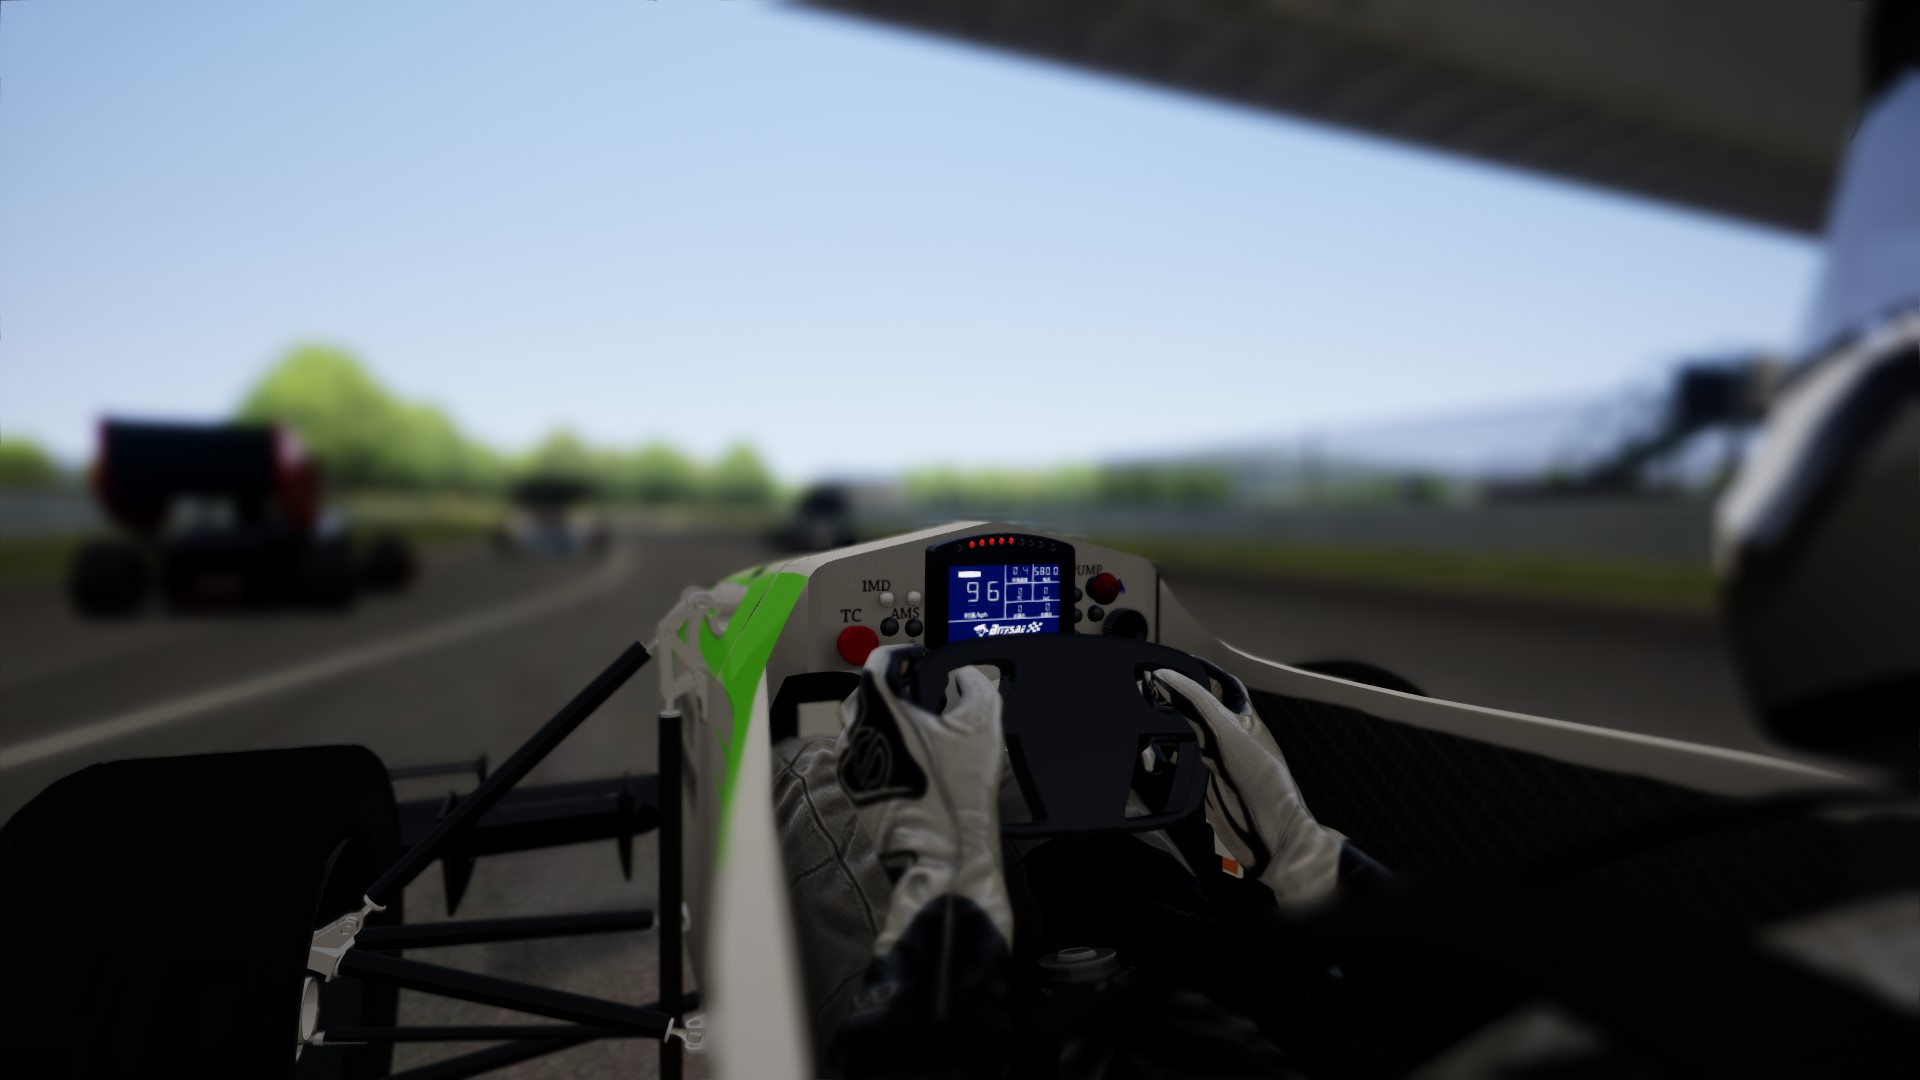
车辆仪表盘及灯光信息 灯光信息在data\digital_instruments.ini中。转速表仪表盘信息在data\digital_instruments.ini中,支持显示速度、转速、温度、G值、油量等等信息。详细操作方法在pipeline.pdf文件P19后。
关于3DSimED 3DSimED可以导入kn5文件,转存为其他格式,同时支持模型修改,贴图导出等 【使用样例】How to change rims for beginners
车手位置及姿势 【使用样例】Driver positioning using Kseditor - Tutorial
车辆声音 使用Content Manager打开需要替换声音的车辆,点击面板中的替换声音,选择一辆车替换即可。 自己制作声音请参照pipeline和FMod and Assetto Corsa - unofficial fix
其余内容正在持续完善中。。。
相关问题交流欢迎通过主页的邮箱联系我~